
When I started getting interested in videos, I was quite confused, as I had only ever taken stills before. I feared the complexities of video, as I had heard of codecs and framerates but had no idea what any of those things really meant – if I needed to record, I’d press the record button on default settings with whatever settings I happened to have at the time.
Maybe I just suck at Googling, but I couldn’t find a comprehensive basic guide that would explain these things to me without skipping over important details that I was missing. I even bought a Creativelive course that helped me understand a lot of things about proper video equipment, audio setups, lighting and working with editors, but even after that I still didn’t know how exactly framerates worked, what shutter speed did as compared to stills, and even, how the hell do people continuosly focus on video mode, which seemed like an impossible thing to get right on my mirrorless, still-photography-focused cameras.
So here I am, writing a basic guide for dummies like me who are somewhat experienced in photography but have no idea how videography is supposed to work. I’ve been shooting random video clips for about a year now, even though photography has still taken up most of my shooting time. So don’t take me for an expert – this is merely a guide to get you started with a basic introduction to running a one-man-show video channel when the only thing you knew before was the shutter button for stills.
Shutter speed
It took me embarrassingly long to really internalize what shutter speed did in video mode. It still works somewhat similar to stills, where slower shutter speed blurs movement and faster ones freeze moments in time. But all you really need to know is that your shutter speed should most of the time correlate to the frame rate you’re shooting. This will affect the look of your video. The rule of thumb is to have a 90 degree shutter angle, whateverthe%&!€ that means, in order to produce video that looks smooth and normal. If your shutter is too slow or too fast, it will make your video seem slurred or jittery. So how do we calculate the correct shutter speed to use? Luckily, no complex math is required. If you’re shooting 25fps video, your shutter speed should be 1/50th. If you’re shooting 50fps, it should be 1/100th. 100fps? 1/200th. Easy maths.
If you want to use an auto-mode for video, this is why it is recommended to use S-priority. Auto modes aren’t something you should be using in a controlled environment, as you want your exposure to stay the same across the scene to make editing later easier, but as dymanic range for videos is no where near as good as for stills, there are situations where S priority will come in handy. For example, if you’re shooting a documentary or a vlog that goes from indoors to outdoors, it is better to have a varied exposure in the video than to have blown out highlights. The other option is to shoot in manual but with auto-ISO.
What if you have amazing footage shot with the wrong shutter speed? Don’t worry, there are annoying and time consuming ways to fix jittery footage in post. And in extreme dark, you might want to drop your shutter speed down to as low as you can go without introducing too much blur, as slighlty weird looking footage still beats ISO 40,000 footage. Most often, I use slower-than-recommended shutter speed when recording in the dark with a lower quality camera, such as doing drone videos in the dark, or making IG story videos on my cellphone in manual mode, or even when recording with an action cam.
Framerate
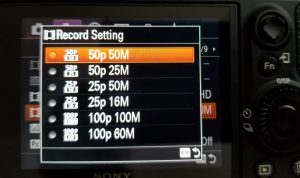
When you go into the menu of your camera, there will be a setting to determine which frame rate you will be shooting at. The normal frame rate to display your video on TV or Youtube or in the movies is usually 24fps, sometimes 25. Just like the 90 degree shutter thing, this is the footage we are most used to seeing and will thus look the most “normal” to most people.
Slow motion comes into play when you increase your frame rate to be 50, 100, 200, or even more, frames per second. But unlike on the latest iphone, when you shoot a higher frame rate on a normal camera, it is not automatically slowed down, but you will have to do this in post. The goal is usually to export footage that is close to 24 or 25fps, so if you’ve shot something at 50, you’ll slow it down to 50%. If you shot at 100fps, you’ll ideally slow it down to 25%. The higher the frame rate, the weirder the footage will look like when played at normal speed. Now if you shot 100fps but don’t want to slow down the footage, there are still ways to fix it in post, but it might still not look ideal due to the shutter speed difference and you’re adding some annoying extra steps to your process.
Stabilization
I had a hard time holding my camera still when i first started shooting video. I thought of video as a dynamic thing, so I moved around and tried to capture as much as possible. You’ll find this to be the case in a lot of amateur videos, where the camera man can’t stay still and is always adjusting, zooming in and out, moving the frame. But if you watch professional footage, a lot of the time movement or reframing only happens with cuts – so a lot of the time, you really should hold the camera still. If you wish to move the composition, shoot another clip, and cut them together in post.
Even the slightest movement, like camera shaking in your hands, is distracting to the viewer. You may not notice these jitters on the tiny screen on the back of the camera, but they will be apparent in when viewed through a monitor. If you have no stabliziation equipment with you, you need to seriously concentrate on holding the camera as still as possible at all times. Holding it against something or using a strap as an additional contact to your body helps. Adding movements should be done as smoothly as possible, try moving your entire body while keeping your hands still.
When I’m shooting with no equipment, I almost always make sure to shoot at 50fps, as slowing down the footage to 50% removes a lot of the shake, or makes it a lot less apparent, as the shake is happening at half of the speed. This is a common trick used by a lot of videographers everywhere.
Then there is always Warp Stabilizer in Premiere Pro and After Effects, that can further smooth your footage. However, if used too strongly, it may make your footage look weird, creating a digital floating sort of effect that just looks fake. Therefore it is best not to rely on it too much, and only use it when necessary and a scene can’t be reshot.
Stabilization Gear
First of all, unless you are always using a gimbal or a steadycam, shooting on a camera body that has internal body stabilization is a huge help. I’m quite happy with the Sony a7iii in this regard. Either way, it can always be turned off, so IBIS in my opinion is a plus for any system. It makes handheld videos a lot more bearable.
But if you know you are going to a dedicated video shoot, it is always a good idea to bring some sort of stabilization equipment. A tripod or a monopod should be fairly obvious in their functions for static or panning shots. It puts the camera on the tripod and it takes a video.
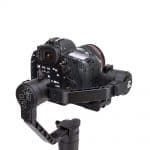
Gimbals, however, are a gamechanger that have made recording semi-pro videos a lot more easier these days. They are not full rigs, but the result is similar, sometimes better. Really the only downside of a gimbal over a rig are ergonomics – gimbals are front heavy. Not only do they weigh a few kilos, which add up on your arms over a long day, I find them quite bad on my back. Most professional shoulder rigs are balanced evenly, but a gimbal is always front heavy, so if you have a bad back, do take this into consideration. Even if they don’t seem that heavy at first, lugging one around for hours at a time can have bad consequences. Regardless of that, it is an amazing tool that adds a lot to your videos. A gimbal is probably the single most efficient bang-for-buck investment you can make to improve your videos almost like a cheat code.
Recommended Gimbals
I cannot yet say much about steadycams or other equipment, but I have done enough research on gimbals that I feel confident to share the following thoughts on some of the most common offerings.
Zhiyun Crane 2
 I used to have a cheap feiyu tech gimbal that didn’t work very well, it was always impossible to balance and would vibrate a lot even when the gear wasn’t that heavy. I got rid of it and upgraded to a Zhiyun Crane 2 almost immediately. I have been quite happy with this purchase, although I cannot use the followfocus function and the app is not as good as you’d expect. But it does all the basic movements well. You can probably find one for quite cheap nowadays, so it’s still worth getting. It’s about $550 on Amazon.
DJI Ronin S
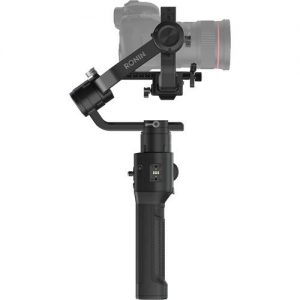
The Ronin S wasn’t yet released when I bought my gimbal, otherwise it would have been my first choice. It has all the features of the Crane 2, plus more. It has better advanced functions and a much easier to use, better programmed app. I am considering selling my Crane 2 so I can get this, but so far I am fine with the basic functions. Right now, The Ronin S is 750 US dollars on Amazon.com, $200 more expensive than the Crane 2.
Focusing demystified
If you are shooting in a controlled environment, it is usually standard to use manual focus instead of auto. The reason being that auto focus shifting and errors can be distracting and may ruin the whole shot. But using manual focus in video mode is not that easy either if you don’t own a rig with followfocus. For run and gun shoots, autofocus is still often the way to go, either that or shooting stopped down and keeping everything in focus as much as you can on manual. It all depends on your gear. For example, Panasonic cameras, while otherwise great for video, have atrocious autofocus. They will focus hunt and be inaccurate, ruining any cinematic quality if you’re shooting in autofocus. On other systems, such as Canon or Sony, this isn’t as big of a problem. Autofocus hunting can further be mitigated by adjusting the focus speed to be lower – a quicker, snappy focus may be beneficial for still photography, but a smoother, more accurate speed is more suitable for video.
There are things such as face-tracking focus in video mode or shoulder rigs or even gimbals with followfocus, a system that allows you to adjust focus manually through your rig, thus eliminating camera shake and generally making everything more ergonomic. Personally though, I tend to use one of three following strategies to keep my shots in focus.
1.) Manual focus on background with a higher f-stop
Back when I was shooting with Panasonic gx8, I did not trust the autofocus for run-and-gun shoots. I kept the focus on the background while pushing my f-stop as high as it can go without introducing too much noise. At night that would be up to f4 in brighter parts of the city. The smaller MFT sensor helped with depth of field issues, kind of ironically compensating for the bad autofocus.
2.) Autofocus with slow motor speed and sensitivity
If I’m focused on foreground details, I may switch to autofocus. Especially for shots that are more focused on tracking a single subject instead of focusing on a wider scene. With the Sony A7iii, autofocus doesn’t hunt when set to normal or even the slow setting. You can find the setting in the menu.
3.) Manual focus while maintaining distance to subject
This is when the scene is more controlled, where you can move by matching your speed to the subject you’re tracking. Keeping a focus distance of 3 meters for example, but never going too far out of focus for moving shots. Then cutting, changing focus for the next shot. Takes more planning and perhaps a more controlled environment, but produces very accurate results.
Picture profiles
RAW video exists, but you won’t be able to shoot that with a consumer or even prosumer level mirrorless camera or DSLR. Even if you could, the files would be huge in size, and hard to run on a normal computer. Therefore, you’re left with video files that are more comparable to moving JPEGs in terms of amount of data or dynamic range they are able to record. The solution to this issue are flat picture profiles. Different camera brands have different names for such picture profiles, such as SLOG or Cinelike-D, but they all serve a similar function – they record flatter footage, with colors that are desaturated and contrast that is low, in order to record better dynamic range. These files will look super boring without editing, but preserve all the necessary data to make them stand out once they are color-graded. Whenever your camera starts to struggle with dynamic range, a flat picture profile can be the first solution to pull out footage that you could never otherwise record. This trick is especially useful for smaller, less powerful cameras or drones – it is the only way to get semi-usable nighttime footage out of a Mavic Pro or an action cam. But I use flat picture profiles on my Sony too, especially when recording nighttime footage in neon-lit Hong Kong, where dynamic range requirements can be very demanding if you wish to preserve both highlights and shadows.
In short, picture profiles will allow you to record more data, but will demand that you spend more time color grading. It’s probably a good idea to further research picture profiles for your specific choice of camera, there are plenty of related videos on Youtube.
Flicker
All lights flicker, but most of it is invisible to the human eye. However, sometimes your camera can pick this up, resulting in footage that doesn’t look very professional. Most of the world uses the 50hz electrical frequency, PAL, while North America and parts of Japan use 60hz NTSC. If you encounter distracting flickering in your footage, you’ll need to match your cameras settings to the frequency. First try changing the general setting to the corresponding HZ setting, and if that doesn’t work or isn’t available, experiment with different shutter speeds and find a suitable compromise for the most pleasing result. Usually, 1/50th will correspond to 50hz and 1/60 to 60hz. It gets trickier when there are several different types of lights present, then you’ll have to find the best compromise in settings.
Some flickering can be fixed in post, but it’s time consuming and will at least to my knowledge decrease the quality of your video by some amount. (Not aware of a better way to do it currently). As with anything in video, “fixing it in post” is not a recommended strategy and you should always aim to record something that doesn’t need to be fixed – but don’t panic if you can’t. Just means you’ll have to work harder in the editing room later.
Editing
Currently the so called industry standard for videographers is Adobe Premiere Pro. With Premiere, you can easily color grade your footage, either from scratch or by using LUTs. LUTs are like presets for lightroom (look-up tables), and can help you get started in color grading. But I would recommend trying it yourself first. Premiere Pro does most other tasks reasonably well, such as basic graphics, effects or transitions. For more advanced effects, there is always Adobe After Effects.
Sound
Audio is easy to ignore when you’re first starting out, but should not be overlooked. Having bad audio can ruin your entire video, unless it’s some sort of a video where you can just add a song over easily. Even then, sound effects can be the difference between amateur and professional looking footage.
The first thing you’ll want to check is if your camera has a microphone port built into it. If yes, then you can save some time and effort by getting yourself a nice hot-shoe microphone, such as the Rode Cideomic Pro. This is a standard solution for run-and-gun style shooting or vlogging. It generally gets the job done adequately well in most situations. If your camera does not have a microphone input, you can still record sound externally, then sync it in post. In Premiere Pro, this is easy to do with just a click, as long as you have both the external track and the internal camera sound that is already synced to the video.
For more professional shoots, you might considered a lavalier mic (for interviews, hosting) or a boom mic (short films, advertisements).
Shooting low light videos
Recently I made a whole seperate video talking about the specific of low light, night time videos. You can check it out on my new Youtube channel below:
Finding Music
You can’t legally just go and grab any popular song to your video, just like you wouldn’t want your pictures to be stolen from you. Finding suitable music can be tricky. One way to do it is by paying for royalty free music. I’ve used Premiumbeat before for some of my Youtube videos, they’ve worked decently well but are quite expensive per song. You can also look for totally free royalty free music with attribution license only. NoCopyrightSounds is a great resource for free, trendy tracks. There are plenty of other providers too that can be found via google. However the problem with these tends to be that either the song has already been used by 10,000 other youtubers because it is good and free, or the song isn’t very good at all. Pick your poison.
Another way is to find musicians who are up and coming and wish to collaborate with artists. If you have some sort of a portfoilio up and an established social media following, you can try to reach out to some people and see if they’d like to collaborate. Once I started making videos, I got a few artists reaching out to me as well offering their music. Just be careful with the terms, only collaborate with people you trust or ideally, have some sort of a contract or written agreement at minimum in case someone changes their mind in the future. Or the artist blows up, gets signed by a record label, and then the label starts copy striking your old videos and all verbal understanding go out of the window.
The third method is to hire an actual composer to craft custom made music just for you. This will cost a few bucks, but it’s less expensive than I initially expected. I haven’t actually taken the plunge on this personally yet, but for a project you’re really serious about, it is an option worth considering.
Recommended Cameras
I will keep this section relatively short, giving you just 3 options if you are looking to upgrade or replace your gear in order to move into a better video setup. However, since this was a guide dedicated those of you who are already photographers, you already have a camera and most likely won’t immediately need to upgrade.
Sony A7 iii – The serious all rounder
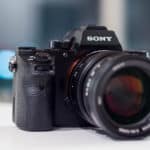 I shoot with the Sony A7 iii, and have been quite impressed with this camera’s video capabilities. The upcoming Sony a7s3 will undoubtedly blow it out of the water, but as of now it’s still the best mirrorless Sony for video. It has good image stabilization built in, crystal sharp 4k, HD at 50 or 100 fps, good focusing mechanics and good picture profiles. It is lacking in advanced codecs and does not have 4k60p. It’s still a stills-focused camera first, but a great choice for video as well – in my opinion the best hybrid shooter at the time of writing.
Panasonic GH5s – Dedicated video mirrorless
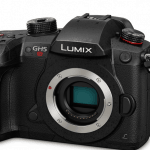 Personally I like to give Panasonic a hard time for their autofocus issues, but other than that they do make great video cameras. The GH5s is their dedicated video camera for more controlled environments. It has excellent video in 4k60 and great codecs. This is a camera meant to be used on a rig or gimbal, it does not have internal body stabilization. The 5s model has improved low light performance to the more hybrid GH5, which is also not a bad choice from Panasonic.
Sony a6400 – A starter
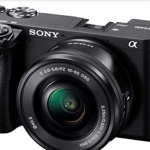 Sony recently came up with the new a6400 that seems like a fairly good compromise between price and usability for video. The system has great lenses and is well optimized for most entry level video work. I have no personal experience with this camera, but from all accounts that I’ve seen and heard, there’s no reason I shouldn’t recommend this one for someone on a medium-budget. It has 4k/30, good autofous, a tiltable screen, decent iso performance. APS-C sensor with no IBIS however.
Further learning
Most of my video education has come from Youtube. There’s a couple of channels that I would recommend to anyone just getting into video.
- Peter McKinnon for quick tutorials on filming and editing, presented in a very entertaining manner.
- Potato Jet for insights on gear and industry techniques such as lighting and working on set
- Every Frame A Painting for analysis on movies that are indirectly helpful to improving your videography
- Sam Kolder to see what every travel video maker is trying to copy, usually with poor results
Thank you for reading, I hope some of this was helpful. To see my video work, here’s a link to my Youtube. If you’d like to hear more from me, head over to the blog or subscribe to my email list below – you’ll also get my lightroom presets for free.