
I’ve been doing random “street cinematography” videos for about 2 years now, and naturally I often get questions about how I shoot them. I’m by no means anything close to an expert, but I’ll try to explain my process in this article.
Night videography settings
If you’ve never done video before, it’s good to first familiarize yourself with some basics. I remember when I first started I was very confused, so I’ve written a basic beginner’s guide here. It’s written with photographers in mind, so it assumes you’ve done some sort of shooting before. But in any case, it’s not rocket science.
Settings for night videos are actually really simple. Your shutter speed is already going to be determined by the framerate you’re shooting. That leaves you with ISO and aperture. With a wider lens, depth of field isn’t gonna even show up as much, so if using a wide angle I’d recommend to always shoot wide open – meaning lowest F-stop number possible. Then you’ll just use the lowest ISO you can for an even exposure. With a longer lens, whether you want depth of field is gonna determine your settings even further, you might need to compromise more. Often, you’ll have no choice but to use higher ISOs if you don’t control the environment. If you do control the environment, use lights if your footage gets too grainy.
For stills, I like to underexpose nighttime footage. In video, there’s less dynamic range and data being recorded than RAW stills, so you’re forced to compromise. Therefore, I almost always simply expose properly at 0.0 lightmeter reading. Think of it similarly as shooting analog film or JPEGs with your phone – you’re not gonna be fixing that much in post. Assuming at least that you’re using a basic consumer camera and not a cinema camera that shoots raw and costs 50,000 USD. If you do have such a camera, you probably already know more than me!
Picture profile
On my DJI equipment I shoot a flat LOG picture profile that is able to capture more details in shadows and highlights. More info on my Osmo Pocket night settings here.
On my Sony a7iii, I usually don’t even use a picture profile at night, because Sony’s SLOG at its current generation is too noisy at night. I haven’t found a good alternative profile, so I’ve stuck to shooting the default profile. It causes me to lose some highlight detail, but you know what – that’s fine with me. The difference isn’t that big after grading the footage.
a7iii no pp
What actually makes your footage good
Don’t worry about your settings or picture profiles too much. Pixel peeping matters even less in the video world than it does in pictures. Shooting good footage isn’t about the crispness of your video, past a certain point anyway. If your camera can’t shoot 1080p without cropping, then you might need an upgrade. Otherwise, there’s a lot you can do without upgrading gear.
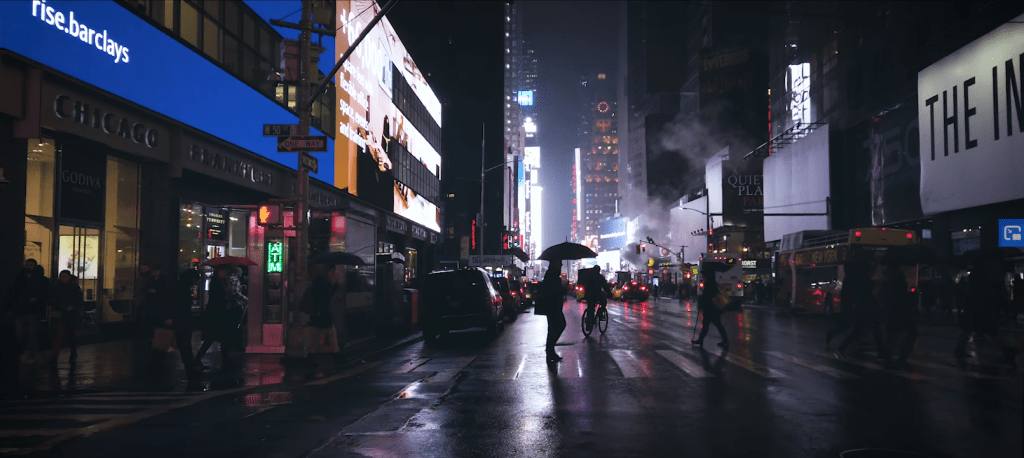
From a “cinematography” perspective (using that term loosely), you should be focusing more on light, movement and framing. When I say light, I mean the light available on any given scene, but also artificial lighting you might have with you, depending on what you’re shooting. For the record, for the stuff that’s currently on my Youtube or Instagram, I don’t use any lights, I just work with what’s on the street. But just because you don’t have lights with you doesn’t mean you can just ignore light. Look for light sources around you and think about how you can use them to optimally light your scene or subject. For example, I’m a sucker for silhouettes, so I look for backlight from sources such as cars passing.
Movement is another big factor that can add so much to your footage. The simplest way to boost the quality of your footage is to buy a gimbal or a stabilizer. This alone will be worth a lot more than if you were to obtain a cinema camera but with no stabilizer. Even just a tripod can work. Personally, I’m a big fan of the Osmo Pocket camera due to it’s size and cheap price. I’ve written about it more extensively here.
Framing is probably the easiest to understand part of cinematography for those of us who have already had experience in photography before. It’s basically the same thing. When you start thinking of your footage as “moving stills” instead of just “video”, then you’re on the right track.
The better you get at understanding light, movement and framing, the better your footage is going to look. It doesn’t matter if you shoot 8k 120fps mega RAW footage on your million dollar RED, if all you capture is unintentional shakycam footage of your niece eating dinner.
Thanks for reading, I hope this article explains my process more clearly. Personally I feel like I’m still in very early stages of videography or filmmaking, I’ve barely scratched the surface in this world. This article isn’t meant to be canon, but to simply nudge people in the right direction. I may add that my decision to not shoot LOG on my Sony is probably not advisable and I might even regret it later. Once the A7S3 comes out, I’ll probably end up buying that camera and dive deeper into the technicalities. But for now, I still have so much to learn about other aspects of filmmaking that extra dynamic range is the least of my worries.
If you have more questions, feel free to send a DM.