

In this tutorial I will share some tips on how you can RIP OFF Blade Runner and learn how to take some dystopian cyberpunk style still photos.
Blade Runner is a movie that has inspired so many photographers over the years. It’s a cinematic masterpiece that basically created the cyberpunk genre, but not only that – you can learn a lot about lighting and worldbuilding, and these lessons can be applied to stills photos too.
Arguably, 2049 is even better in terms of pure cinematography, but I’ll save that for later and focus on what we can learn from the original for now! And trust me it’s a lot.
The video version of this article is now ready and can be watched below:
Step 1 – Shooting Blade Runner style photos
First off, when it comes to taking cyberpunk style photos that look like Blade Runner, you really do have to find a setting that is similar enough that it can allow the style to manifest. You can’t just photograph a puppy in bright daylight and slap CYBERPUNK 2020 DOT LUT on it and expect a good result.
So let’s look at what creates the cyberpunk vibe in the movie.
Often, people associate purple neon glow with Blade Runner, and while there are neon lights in this movie, they aren’t nearly as purple as people sometimes seem to imagine. This scene in the beginning of the movie is the closest you get to the “purple” neon look, which is more correctly called “Outrun”. Blade Runner is more blue and cold rather than purple.
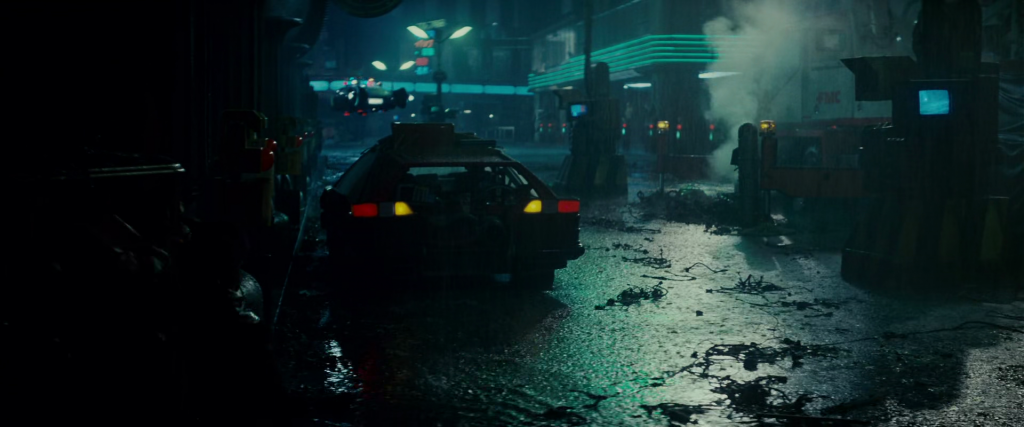
On the street level there IS however A) constant rain and B) lots of steam and/or smoke. The scenes are very crowded and dystopian with lots of advertisements. high tech, low life. These are the elements you should pay attention to. Also it’s almost never daytime.
So just for fun, let’s ask the question: which city in the world today is the most like Blade Runner in real life?
Lots of people equate Tokyo with Blade Runner – and don’t get me wrong, Tokyo has some of the elements and is amazing in general – but it severly lacks steam and many of the streets are often too clean. For this reason, I think the actual closest real world location of Blade Runnner would be a mix of New York and somewhere in China.
New York‘s underground heating system spits out steam all over Manhattan, and the open steam pipes often give a really Blade Runner esque visual. Some parts of Manhattan are really chaotic as well, especially when not in a pandemic. But other parts are calmer and the city is built in a grid, which means there isn’t as many alleys and the like which you would find somewhere in Japan or China.
There’s also lots of chinese signs in the movie, hinting that the areas Deckard explores is probably a Chinatown.
New York’s Chinatown is great on paper but in practice the buildings there are too American and it’s not really chaotic enough. On the other hand, actual cities in China while being chaotic, don’t have the same steam pipe systems which are actually really important in creating the athmosphere of the movie – there’s only a few scenes that don’t have steam in them and I believe it was even inspired by new york city in real life.
So even though there isn’t really a perfect real world equivalent location, I think ideally if I had an unlimited budget I would bring a fog machine to China or Hong Kong if I really wanted to recreate an authentic Blade Runner environment.
Although that’s probably not realistic for most people, and it doesn’t have to be – you don’t have to copy Blade Runner scene by scene, the point of this video is more about what we can learn from the movie.
Cityscapes
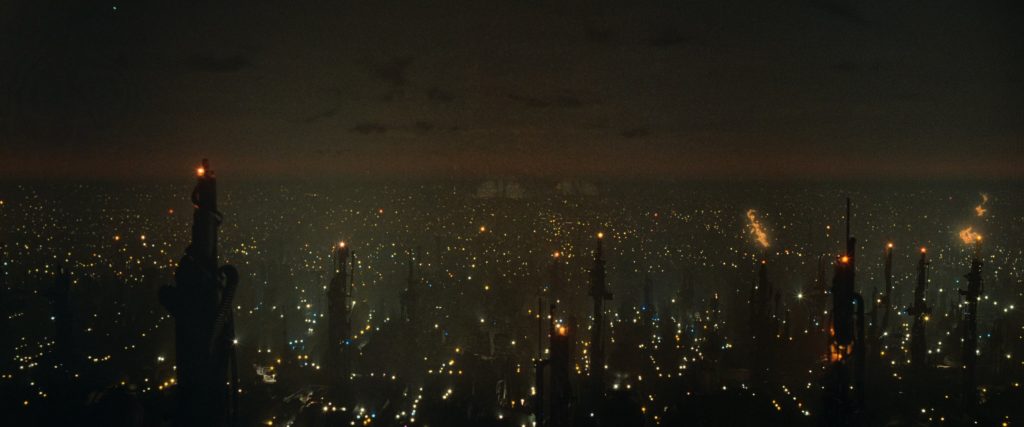
On the wide high up shots there are really tall skyscrapers. Again, this is a lot more like China than it is like Japan, because earthquakes prevent Japanese from building skyscrapers that high, and as crowded they are, China is a whole another ballgame. I think Chongqing and Guangzhou are good options to take a drone to and fly at night – if you have the balls.
Lighting
There is A LOT of amazing lighting in this movie. But as a photographer, we usually can’t do as much as DoPs do as far as setting up lighting goes, so for us it’s more about being able to recognize lighting in the wild. For this reason, I’m going to keep this section about lighting brief, even though there could be a lot more said about it.
A lot of the lighting in this movie is quite dramatic, contrasty and dark. A lot of backlighting is used, creating deep silhouetted shadows. And again, a lot of smoke, haze and fog is used, not just for the atmosphere, but also to shape light and create light beams.
The movie was shot in 1982, but that’s not the only reason everyone is smoking – I think it just gave the cinematographer and excuse to have even more smoke in the scenes.
Scenes are exposed for the highlights, often leaving the shadows dark, creating a mysterious mood. if the shadows were exposed better, the mood of this movie wouldn’t be the same, so pay attention to that and avoid using HDR.
The movement of light in this movie often creates a dynamic, chaotic environment, but that is more applicable to videos rather than stills. When I was taking these screenshots of the movie, I realized it felt very similar to doing photography out there on the streets, of how as a stills photographer, your job is to capture the exact right moment that the light hits the right spot for the best possible picture.
Inside buildings
The building interiors are somewhat (brutalistic?). They are clean and minimal with lots of empty space. These are rich people houses after all, whereas Deckard’s aparment is just a regular old apartment. But in these rich people houses, it’s all lighting. Notice how everyone’s smoking – not only is it the 80s when this film was filmed, but it also conveniently adds SMOKE to the scenes. Ridley Scott also very likely utilized a haze machine to shape light in a lot of these scenes.
Cyberpunk characteristics
Other than these tangible elements, such as rain, fog, lighting, etc, Blade Runner and the cyberpunk scene as a whole has certain characteristics that are good to remember if you want to go for that TRUE CYBERPUNK style look.
(By the way never ever make the mistake of posting just a rainy asian street on r/cyberpunk unless you want death threats)…
Cyberpunk is HIGH TECH, low life. Dystopian and grim on the lower levels. Full of human suffering but technological advancements. Megacorporations and loud advertisements. There was no social media in 1982, but it definitely fits.
Does that remind you of anything? One of the reasons I find it so fun to explore cyberpunk style photography is not just the art style, but it’s the fact that in many ways we ARE living in a true cyberpunk dystopia already, at least the early stages of it.
Look for these elements too for maximum reddit approved cyberpunk scenery.
Editing Blade Runner Style on Adobe Lightroom
So now that you hopefully followed my advice and instead of a picture of your cat, you took a cool rainy steamy photo with lots of human suffering but also Coca Cola and the latest iPhone 47, it’s time to see what kind of color grading and edits we can do to achieve this look in lightroom.
Spoiler, if you saw my earlier video about making cinematic photos, this is gonna be actually kinda similar, but bear with me we’re still gonna go through possibly a little more detail and edit this one photo from start to finish this time.
Unfortunately it doesn’t have Coca Cola or human suffering but this scene definitely reminded me of the scene where deckard is eating his noodles, and we do have a bit of rain and lots of steam.
The 3 most important edits here are the tone curve, temperature and color adjustments, and split toning.
I don’t actually like to use split toning that often, but whenever steam or smoke it present, it’s a much better way to color your image realistically without totally switching the color of the steam.
Then we make some fine tuning, but all you can really do is edit the tones a bit. I’m sorry to say there’s no magic you can do there, the real fun is taking the actual picture that has Blade Runner elements to begin with.
Maybe some day I’ll make a Blade Runner themed LUT pack for videos, and if I do I’ll shill it in the description. If you’re watching this sometime in 2021 it may be there but no promises. As for immediately after release, I don’t have anything to sell you except my presets which are kinda similar but not exactly, both free and premium, which you can find on my site.
But again, they only work if you can take photos with the potential in the first place.
And that’s it for the tutorial. In the future, I also wanna talk about the additional stuff we can learn from Blade Runner 2049 too, but the reason I wanted to seperate it is because it’s my favorite movie of all time and I’m still new to making YouTube videos and which each video I feel like I’m getting better at this and learning, so I wanted to save it for later so hopefully the result can be better. But if you do wanna see that and haven’t already subbed, you know what to do. And also I’d like videos like this about other classic films that have distinct visual styles and maybe even old photographers or maybe even just do interviews with current ones. If you guys have any ideas or just wanna say hi, leave me a comment, I really appreciate all of them even if it’s just a few words as I’m still very new on this platfrom. See you next time!